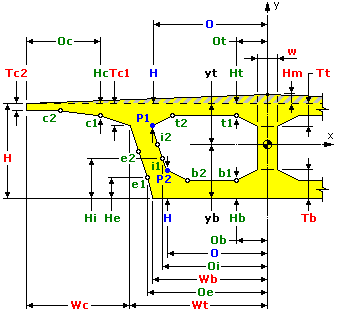
User Area
Software Release History - Version 14
Index
| Version
14.7 | Version
14.6 | Version
14.5 | Version
14.4 | Version 14.3 | Version 14.2 |
Version
14.1 | Version
14.0
New
Facilities and Improvements in Version 14.6
Overview
- Eurocode traffic loading extended
- Changes to Discrete Point Loading
- Changes to Prestress / Post-tensioning loading
- Camber facility added to precast complex box section calculator
- New shape interpolation option for use when defining multiple varying sections
- Super-T precast beams added to set of supplied pre-cast sections
- Changes to the Material Library
- Animation of modelling loadcases and basic load combinations
- Shell / beam slice results for multiple loadcases
- Enhancements to the Print Results Wizard
- Using a deformed mesh as a basis for a new analysis
- File import of supported third-party software
- Draping and visualisation improvements for LUSAS Composite users
Eurocode traffic loading
extended
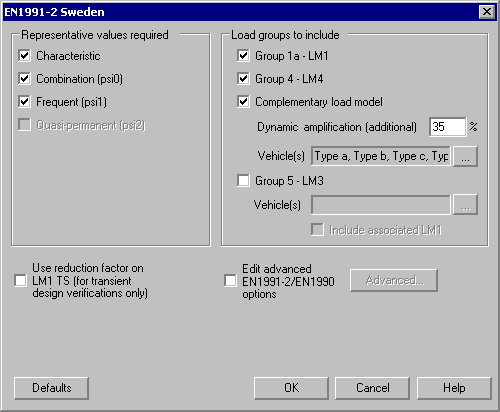
The LUSAS�Traffic Load Optimisation software option has been extended to allow the inclusion of the Complementary Load Model as required by the Swedish National Annex to EN1991-2.
The LUSAS Traffic Load Optimisation
software option also now includes an option to select EN1991-2 Poland on
the main Vehicle Load Optimisation dialog. This sets default values for
NDPs and offers Load Model 3 Special
Vehicles according to recommendations in EN1991-2 and EN1990, and
offers traffic load options from the informative Annex A to EN1991-2.
Changes to Discrete Point loading
Discrete point
loading can now be defined as load components in the X,Y and Z
directions and not just as loading in a singular X, Y or Z direction.
Changes to Prestress / Post-tensioning
loading
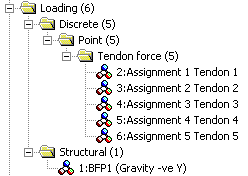
Tendon loading has been modified to
exploit the changes made to Discrete Point loading, which now allows
point loading to be defined as load components in the X,Y and Z
directions and not just as loading in a singular X, Y or Z direction,
such that:
- The number of tendon entries in the
Attributes
 and Loadcase
  Treeviews are now significantly reduced with only one entry per
assignment needing to be present.
Treeviews are now significantly reduced with only one entry per
assignment needing to be present.
- Search areas are now created and
used by the prestress wizards to define the target to be loaded.
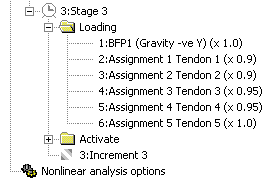
- Load factors are now used to
represent elastic shortening and these can be seen in the Loadcase
Treeview.
Because of these changes, significantly
less tendon data is held in the model and in relevant treeviews, and
significantly less information needs to be generated when creating the
prestress report. As a result, the automated process of deleting any
existing tendon loading attributes, calculating new tendon loading,
creating new tendon loading assignment data, and reporting on the
prestress data created each time the prestress wizard is run is
significantly faster. In tests, for models with many hundreds or
thousands of tendons that previously took an appreciable time to
complete, this automated process took just seconds. Note that when
running the prestress wizards on models created prior to V14.6 the
initial deletion of the existing tendon data will take longer than
that for deleting the equivalent tendon data generated in V14.6.
 |
 |
|
Simplified
tendon loading assignments in Attributes Treeview
|
Use
of load factors on tendon loading loadcases in Loadcase
Treeview
|
Note that by right-clicking on a tendon
loading assignment in the Attributes
Treeview the search area used for that assignment may be visualised.
Camber facility added to precast
complex box section calculator
The complex box
section calculator now allows for a camber to be optionally created in
the top slab for all permissible section types.
 |
 |
|
Updated
precast complex box sections
|
New shape interpolation option for use
when defining multiple varying sections
A new Function option
has been added to the existing Smoothed, Linear, and Quadratic shape
interpolation options on the Multiple Varying Section dialog. When the
Function option is chosen, a Specify Function Order dialog appears
allowing the Order (n) for the function shown on the dialog to be
specified. A value of 1.6 is set by default.
 |
|
Function-based
shape interpolation
|
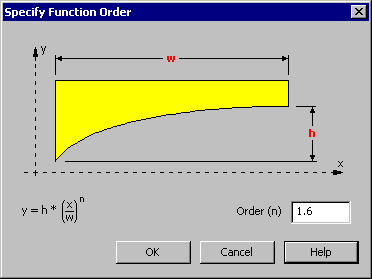
Super-T precast beams added to section
library
Australia and New
Zealand open and closed section Super-T beams T1 to T5 have been added
to the precast beam section library. Sections can be defined as slab
and beam or as beam only. Use Bridge > Precast Beam to access
the dialog.
 |
|
Super-T precast
beam dialog
|
Changes to the Material Library
Concrete material
properties have been added for the following countries and
codes/references:
- India
(IRC:21-2000)
- New
Zealand (NZS 3101-1:2004)
Steel
material properties have been added for the following countries and
codes/references.
- India
(IS800:2007)
- New
Zealand (NZS 3404:1997)
Animation of model loadcases and basic
load combinations
Animations can now be
created for particular model loadcases that are saved with a model
file (previous releases have only permitted results loadcases to be
animated). This allows easier and
faster visual checking of a staged modelling process and allows
animations of these modelling processes to be created automatically.
Results from Basic
combination loadcases can also now be selected for inclusion in an
animation in just the same way as individual results loadcases can.
Results from Envelope and Smart Combination loadcases (that are also
both saved with a model file) cannot be animated.
 |
|
Model
loadcase selection for animation
|
Shell / beam slice results for
multiple loadcases
Slice resultant
results created using the Utilities > Slice Resultants Beams/Shells
menu item can now be output for one or more loadcases:
- Active
- prints slice results for the active loadcase to a slice output
window.
- All
- prints slice results for all loadcases to a text file named
SliceResultantsBeamsShells.prn in the current working directory.
- Selected
- prints slice results for entered loadcases to a text file named
SliceResultantsBeamsShells.prn in the current working directory.
As an example, entering 1-5,7 would select loadcases 1 to 7
excluding loadcase 6.
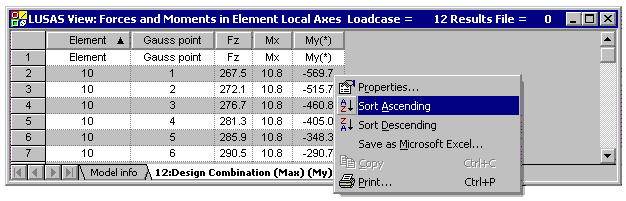
Enhancements to the Print Results
Wizard
Results selection
By using the
Utilities > Print Results Wizard menu item, selected results values
may now be output to the screen in a tabular listing format for
multiple loadcases. In addition, and in a similar way in which results
can be selected when using the Report Generator, the extent of results
can be specified. This now permits selection of results for elements
showing results; the visible model; the full model or for a specified
group.
When the optional Coordinates
checkbox is enabled the global X, Y and Z positions of the nodes or
gauss points (as appropriate) can be included as separate columns in
the printed output. This enables sorting of nodal and gauss results
data by coordinate.
Results display
Results for each
selected loadcase are displayed on a separate tab in the print results
window. A model info tab also appears in all output windows and
provides basic information about the model.
Results manipulation
When the Printed
Results window is displayed a context menu can be invoked which allows
for the printed results data to be manipulated:
- Properties
The number of significant figures or decimal places can be
changed.
- Sorting of data
Results data can be sorted in ascending or descending order. In
addition, data sorting can be achieved by double-clicking on a
header to sort by that column name. A second double-click on the
same header will carry-out a reverse sort.
- Saving to a spreadsheet
The contents of the current tab or all tabs can be saved to a
spreadsheet or to a text file.
- Copying to the clipboard
Selected cells or the whole grid can be copied to the clipboard.
- Printing
The Print option sends the contents of the active tab to the
printer.
 |
|
Manipulating
printed loadcase results
|
Using a deformed mesh as the basis for
a new analysis
A new menu item Utitilies
> Mesh > Use deformations allows the deformed mesh
caused by one analysis to be used as the starting point for a further
analysis. A results file must be loaded in order to activate this menu
item. The mesh may be tabulated with node coordinates computed from
the deformations in the active loadcase multiplied by a specified
factor.
This will benefit
users who wish to include initial imperfections in a model prior to
running a nonlinear step-by-step buckling analysis, or those involved
in High Precision Moulding analysis.
File import of supported third-party
software
ABAQUS input files
and ANSYS data files can now be imported as the basis for creating a
geometry-based or mesh-only model in LUSAS.
Draping and visualisation improvements
for LUSAS Composite users
Specifying a draping offset
For LUSAS, FibreSIM
and Simulayt Draped Solids and Shells layup methods an offset can be
specified to allow a composite layup to be draped on a drape surface
which lies within a component. For this situation, a Positive or
Negative Offset can be specified according to the position of the
drape surface. The Default option should be used when the drape
surface is on the face of the component.
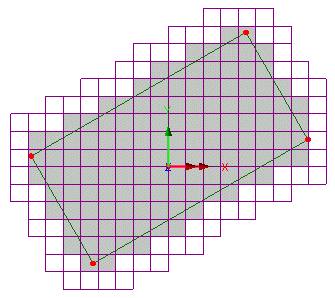
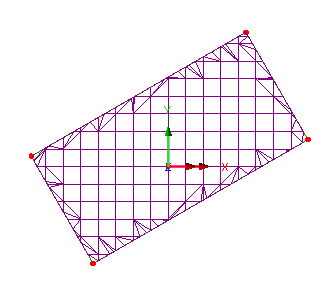
Extending the draping grid
LUSAS Draped Solids
and Shells grids are automatically trimmed at Surface boundaries.
FiberSIM and Simulayt generated grids are not. If required, the
draping grid can be extended by one grid row to ensure the edges of
the component are fully enclosed by the draping grid. For FiberSIM and
Simulayt grids this is specified at the file import stage (accessed
via the Attributes > Composite menu item). For LUSAS Draped
Solids and Shells grids, this is done via the Draping options on the
Model Properties dialog.
 |
 |
|
Example of
FiberSIM or Simulayt generated draping grid (shown grey) being
extended by one row
|
Example of
LUSAS Draped Solids and Shells draping grid being trimmed to a
surface boundary with infill triangular elements being created
|
Specifying a drape locking angle
When importing
FiberSIM or Simulayt data, a locking angle may be specified so that if
an imported grid has a skew angle greater than that specified, an
error is generated.
Visualisation of draping grid and
active composite layer
When visualising ply
directions for a layer in a composite model (accesed via the
Visualisations menu option for the Composites entry in the Attributes
Treeview) two additional options are now available:
- Draw grid
- Shows the draping grid for the LUSAS, FiberSIM or Simulayt
generated composite lamina name that is set active in the
Attributes treeview.
- Fill layer planes
- Draws the layer in solid fill making it easier to visualise the
layer's position within the model.
 User
Manuals User
Manuals
All relevant
documentation has been updated for this new release and is provided in
PDF format as part of any V14.6 software download file or on the V14.6
software CD. Changes have been made to the following manuals:
- Modeller User
Manual
- Element Reference
Manual
- Application Manual
(Bridge, Civil & Structural)
- Application
Examples Manual (Bridge, Civil & Structural)
Changes to Worked Examples
All examples have
been reviewed and updated as required for this release. Of particular
note are:
- Bridge Slab
Traffic Load Optimisation:
updated to use LUSAS Traffic Load Optimisation with Eurocode
EN1991-2 Recommended Values settings. Example also shows
comparative results from using National Annex settings for the UK and
Sweden.
- Simple Grillage:
updated to illustrate use of changes to Print Results Wizard
New Worked Example
- Track-Structure Interaction to
UIC774-3 : Examines the
track-structure interaction between a braking train and a single
span bridge to replicate (as far as the original test data allows)
testcase E1-3 which can be found in Appendix D.1 of the UIC774-3
Code of Practice.
Potential issues for Windows 7 users
opening PDF files referenced in CHM files
At the time of
releasing the on-line help files for Version 14.6 it appears that some
users on Windows 7 machines with IE9 installed may not be able to open
the PDF files that are linked in the Contents panel of the LUSAS
Modeller Online Help. "Microsoft HTML Help executable has
stopped working" is reported when a PDF manual is clicked in the
Contents panel.
If problems
are found in opening these files in this way please note the
following:
- Uninstalling
IE9 and re-installing IE8 has been found to allow the PDF files
to be opened successfully from the Contents panel.
- Other
workarounds/solutions may be provided by Microsoft during the
availability and support of this particular LUSAS software
release.
- All manuals
are supplied in PDF format on the installation kit and these are
normally installed into the <LUSAS Installation Folder>
/Programs/PDF_Manuals folder.
Retired elements and facilities
|
