User Area
Software Release History - Version 14
Index
| Version
14.7 | Version
14.6 | Version
14.5 | Version
14.4 | Version 14.3 | Version 14.2 |
Version
14.1 | Version
14.0
New features / enhancements in Release
14.0
User Interface
| Modelling | Model
Manipulation / Feature Selection | Identification
/ Feedback | Visualisation
| Results Plots | Compatibility
Version 14 sees
a significant improvement in the everyday usability of the range of
LUSAS software products.
- A new solid modelling engine
provides more power and flexibility allowing complex geometry to be defined by combining, subtracting
or intersecting existing Surfaces or Volumes.
- A new OpenGL implementation
provides for much faster graphical displays.
- Substantial
enhancements to the selection and viewing of model features make
working with large and complicated models much easier.
- A multi-level undo/redo
facility makes modelling corrections far simpler.
- CAD interfacing via IGES files
and automatic tetrahedral meshing is now supported and DXF file
import has been improved.
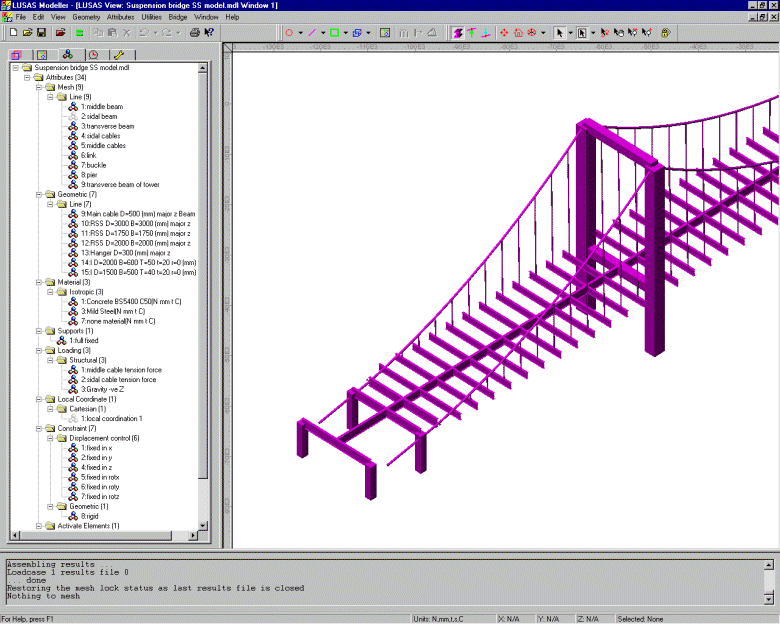
- Fleshing (the visualisation of
assigned geometric properties) helps ensure that the geometric
thicknesses, eccentricities and the orientation of beam members
are correctly defined.
- Results viewing enhancements
include the plotting of results for any element type without
prior selection, plotting of diagrams orientated to element axes
and the saving of high-resolution BMP and JPG files.
User Interface
The look and feel of the Version 13
interface has been retained but in Version 14 many enhancements
relating to the selection and visualisation of model features have
been made.
- In the Treeframe, the Groups Treeview has been improved
to remove sub-groups which simplify their operation enormously.
- In
the Attributes Treeview any attribute can be selected and visualised
directly without having to group items together first as had to be
done in Version13. Attribute assignments which involve a loadcase
are now listed in the Loadcase Treeview and this makes the checking
and the removing of such assignments much more straightforward.
- Many
general enhancements have also been made to dialogs to improve their
ease-of-use and of particular note are the combination and envelope
dialogs which have been increased in size to accommodate the long
loadcase names that occur in bridge analysis.
- On starting a new
model you now have a choice of user interface for structural,
thermal/coupled or composite analysis, resulting in simplified menu
options being displayed for the type of analysis to be undertaken.
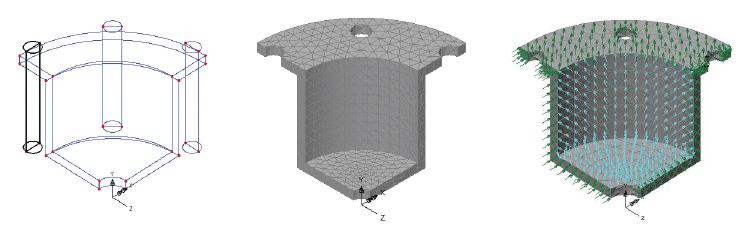
 Geometry
Definition Geometry
Definition
Version 14
incorporates a whole new solid modelling engine. This provides far
more power and flexibility than the previous Version 13
implementation. Curved surfaces and lines can be created,
intersected, and selected in ways that were not possible before. In
Version 14 lines, surfaces and volumes have an awareness of their
underlying shape. For example, a cylinder knows that it is
cylindrical. This ensures that the underlying shape is preserved at
all times, no matter what operations may be performed.
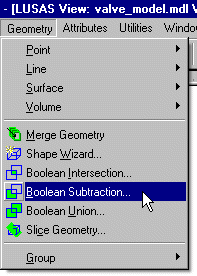
Boolean Geometry
Boolean operations have been added
and allow complex geometry to be defined by combining, subtracting
or intersecting existing Surfaces or Volumes. Selected Volumes can
also be sliced by a plane and the resulting geometry can be deleted
either side of the slice if required.
 Holes
in Surfaces Holes
in Surfaces
Holes in surfaces are now supported.
Surfaces representing holes can be inserted into an existing surface
and any mesh arrangement will be automatically adjusted around the
inserted opening.
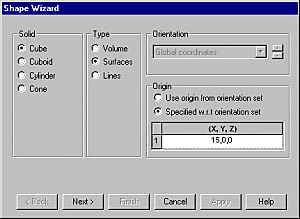
Shape Wizard
A shape wizard is provided to enable
analytical shapes to be defined easily. Cubes, cuboids, cylinders
and cones are currently supported.
Drawing Grid
The drawing of lines, points,
surfaces and volumes by using the cursor can now be carried out by
snapping to a visible grid in either the XY, YZ, or XZ planes.
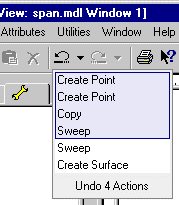 Undo
and Redo Undo
and Redo
Multi-level undo and redo has been
implemented.
 The Undo button allows any number of actions since the last save to
be undone.
The Undo button allows any number of actions since the last save to
be undone.
If more than the last action is to be undone then the actions to be
undone may be selected from the undo history list by clicking on the
down arrow at the side of the undo button.
 Redo is available to enable the undone actions to be reinstated.
Groups
Groups can now be explicitly named
when they are created and sorted alphabetically. Shared groups are
no longer created. The Version 13 restriction that each item belong
to only one group has been removed. It is no longer necessary to
create groups in order to make items visible or invisible. Similarly
it is no longer necessary to create groups in order to view results
in models containing more than one element type.
 Meshing Meshing
Arbitrary shaped irregular volumes
defined by any number of surfaces can be meshed automatically with
tetrahedral elements. For extruded volume meshing, volumes defined by sweeping an
irregular surface can be meshed automatically with a regular volume
mesh.
CAD Interfacing
IGES import of complex geometry is
supported. The imported IGES data is made up of a number of discrete
surfaces that need to be merged together to create volumes before
meshing can take place. IGES export is included.
DXF file import is more robust and
now allows you to select features and layers for import prior to
execution.
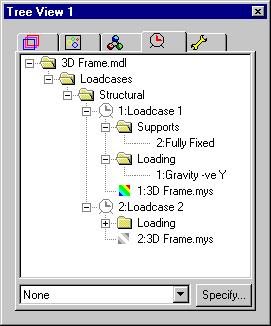 Loadcase
Treeview Loadcase
Treeview
Loadcase dependent attributes are now
displayed in the Loadcase Treeview where they can be visualised and
selected. As a result, attributes can be deassigned more easily from
a chosen loadcase and slideline types can be changed more easily
part way though an analysis.
Load Curves
Load curves have been updated to be
far simpler to use and enable multiple load curves to be defined for
analysing nonlinear and transient dynamic variations in loading and
boundary conditions.
Model Manipulation
/ Feature selection
 A complete list of all model
manipulation, feature and area selection keys and modifiers can be
found in the new Keyboard Shortcut Guide. A complete list of all model
manipulation, feature and area selection keys and modifiers can be
found in the new Keyboard Shortcut Guide.
Rotate, pan and zoom
Model rotation, pan and zoom are all
now available at the same time using keyboard shortcuts and/or
combinations of mouse buttons. For example the model can be rotated
either by using the rotate toolbar button or by using the normal
cursor whilst holding down the R key:
- Rotate model = normal cursor + R
key
Model rotation and model zoom now
automatically centre on any currently selected items.
Feature Selection
Features displayed in the graphics
window may be additionally selected using normal cursor mode in
conjunction with specific keys. For example the selection of only
lines can be achieved by using the normal cursor whilst holding down
the L key:
- Line selection = normal cursor + L
key
Area Selection
Two new area selection techniques
have been added:
 Circular area selection is useful
in curved models
Circular area selection is useful
in curved models
 Polygonal area selection for
complex geometry
Polygonal area selection for
complex geometry
In addition by using an area
selection in conjunction with the Alt key, items intersecting
the selection perimeter can also be selected. This allows quick and
easy selection of parallel lines, such as those representing members
in a grillage or columns in a building frame.
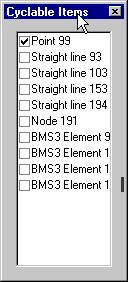 Cycling
Through Selections Cycling
Through Selections
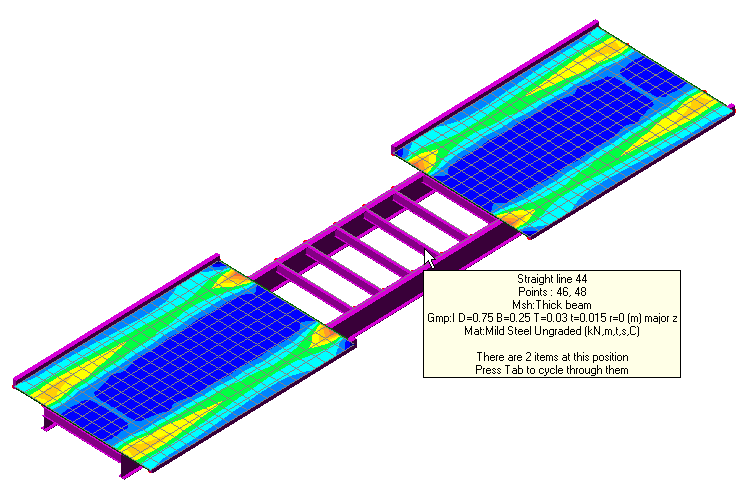
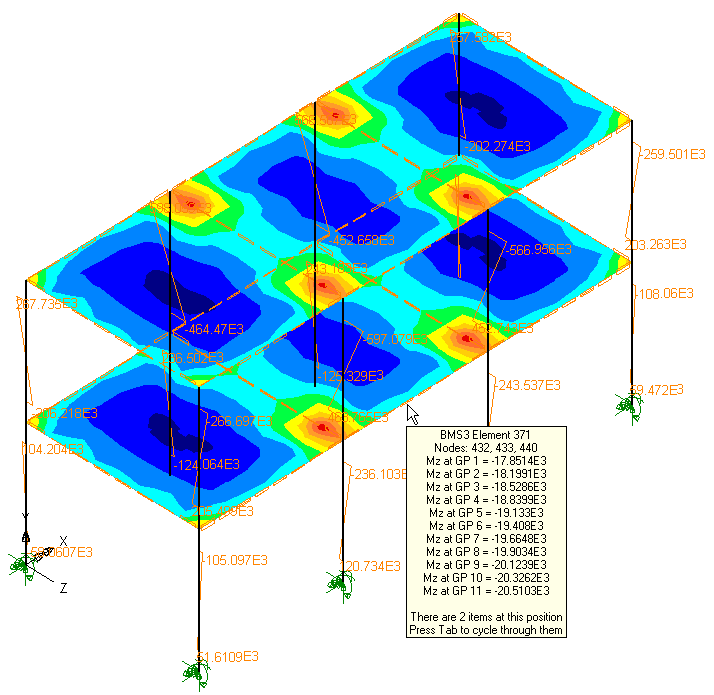
In addition to pressing the Tab key
or mouse clicking at the same position to select different model
features, a right-click in the Selected area of the Status
Bar will display a menu from which a list of Cyclable items or Next,
Previous, Closest or Furthest items may be selected.
Browsing Selections
Items in your current selection may
be viewed in the Browse Selection window. This can be displayed from
the View> Browse Selection menu item. This menu can also
be triggered by a right-click in the Selected area of the
status bar at the bottom of the graphics area, or by right-clicking
in a graphics window.
Advanced Selection
Geometry can now be selected
according its connectivity to surrounding features. End points, free
lines and external surfaces can be highlighted in this manner.
Datatips
Datatips are now shown when the mouse
is positioned over a geometry feature, element or node. Datatips
reveal useful information such as name, position, assigned
attributes etc., easily without having to select an item first to
investigate its properties and without cluttering the display.
 Identification
of Objects Identification
of Objects
A double-click on a listed item in
the Text Output window can now be used to help identify or select
particular model items for subsequent investigation or manipulation.
Attribute Usage
Coloured attribute bitmaps in the
Attributes Treeview now indicate an assigned attribute. A greyed-out
attribute bitmap indicates a non-assigned attribute.
Fleshing of Geometric
Attributes
A fleshing facility has been
introduced. This allows surfaces to be drawn showing their assigned
thickness and beams to be drawn showing their assigned cross
sections. This facility allows consistent attribute assignments,
especially where different ones meet, to be easily obtained and beam
orientations to be quickly checked.
 Fleshing of beam cross sections and
surface thicknesses can be toggled on and off using the fleshing
button.
Fleshing of beam cross sections and
surface thicknesses can be toggled on and off using the fleshing
button.
Beam Orientation
Beam orientation is now controlled by
defining a local rotation on the line mesh assignment dialog.
Visualising Supports
and Loads
 Support visualisation can be toggled
on and off using the support visualisation button.
Support visualisation can be toggled
on and off using the support visualisation button.
 Load visualisation can be toggled on
and off using the load visualisation button.
Load visualisation can be toggled on
and off using the load visualisation button.
Attribute Visibility
Attribute visibility is no longer
controlled by using the Groups facility. Instead, the visibility of
attributes is now controlled directly by the selection of the
attribute or feature in the Attributes Treeview. In this way all
beams of a particular section section size can be selected, or, all
elements using a particular steel grade identifed.
It is now possible to plot results
when more than one element type is displayed. Dialogs such as the
contour properties dialog allow you to choose which element type is
to be plotted. Other elements that may be visible will simply be
ignored. Diagrams can now be drawn orientated to the element axes as
an alternative to being drawn flat to the screen/page. Datatips can
be used to view element or node results by inspection.
Loading on Results
Plots
Model loading can now be superimposed
on deformed mesh plots and results plots.
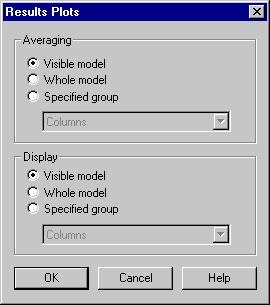 Results Groups Results Groups
Results averaging is no longer
controlled by sub-groups. Instead it can be controlled by averaging
on what is visible, or by the whole model, or by a selected group.
Printing and Saving
Model and Results Pictures
Views of your LUSAS model may be
printed directly to the default printer from page layout or working
mode by using the Print button. A printing scale and an origin can
be defined.
Model views can be saved as high
resolution BMP, JPG, or WMF files. Files are saved to a fixed size
of 1800 pixels in width with a height proportional to the size of
the graphics window when saved.
Windows Meta Files now contain bitmap
data instead of scalable vectors to represent the modelling and
results information. As a result significantly smaller file sizes
for particular results plots are obtained.
Command Language
Version 14 session files and recorded
sub-sessions (macros) are written in Visual Basic Script using the
LUSAS Programmable Interface. This incorporates variables, loops,
conditions, subroutines, arrays and many other high-level
programming concepts which were not available in the Version 13
command language.
Model File
Compatibility
Version 14 model files are not of the
same format as Version 13 model files. Instead V14 uses a much more
efficient and secure system that reduces file size and complexity
and reduces the risk of loss of data. Provided that V13 is installed
on the same computer, V13 models can be loaded into V14 with no
additional effort. V14 can import V13 command files provided that
they were created from the File> Save as dialog. Version
14 cannot read Version 13 session files.
Back to Top |
